
Essential Checklist Installation is a big investment, and it’s important to make sure you take the necessary steps to ensure a successful job. Proper roof preparation can save you time and money down the road. Before you begin your new roof installation process, it is essential to complete a thorough roof preparation checklist.
To get started on your roof preparation checklist, first, inspect the existing roof for any damage or area of potential concern. Look for cracks, holes, and other signs of wear and tear that may need to be repaired before you begin installation. This will help you avoid any last-minute surprises that can cause costly delays in the job.
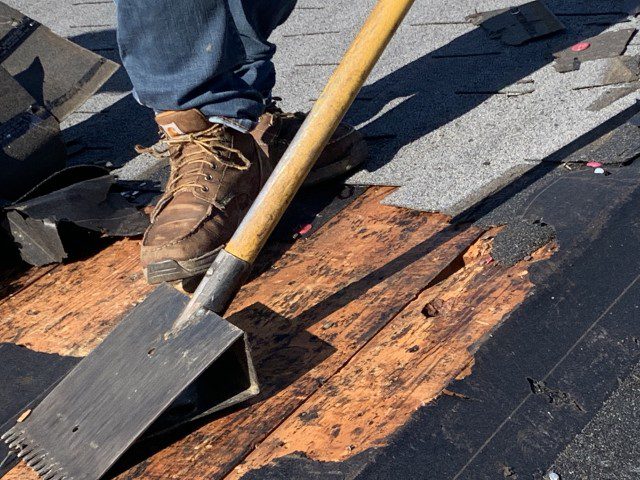
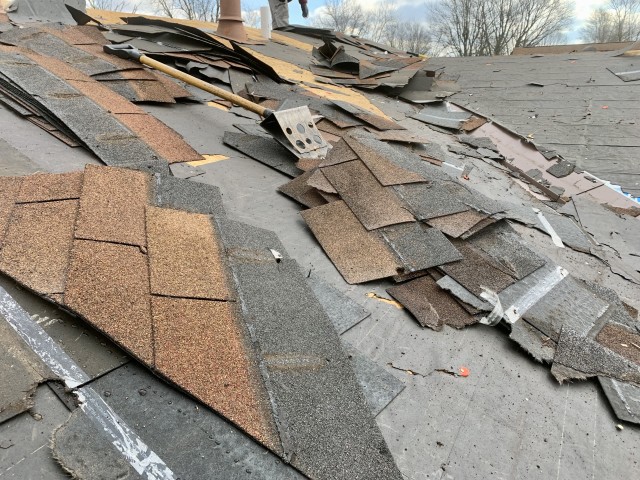
Next, remove all debris from the roof surface and check for loose or missing shingles. If there are any areas with damaged shingles, they should be replaced before installing new ones. Also, make sure that any exposed fasteners have been properly sealed with caulk or sealant to prevent leaks while protecting against corrosion from moisture exposure.
Finally, it is important to ensure that your roof deck has been adequately secured. This includes checking for any warped or sagging boards, and ensuring that the deck has been securely fastened to the rafters. Additionally, inspect any flashing around chimneys, vents, or skylights to make sure it is secure and properly sealed.
By completing these steps on your roof preparation checklist before installing a new roof, you can rest assured knowing that your investment will be well protected. With proper planning and preparation in place, you’ll have peace of mind knowing that you are ready to begin your new roof installation process.
Table of Contents
ToggleRoof Preparation Checklist
When preparing for a roof replacement, there are essential steps to ensure a successful and long-lasting outcome. Here is a concise checklist based on the provided search results:
Remove Existing Materials: Ensure old materials are removed to avoid issues like rotten wood decking underneath. Full Inspection of Existing Decking: A thorough inspection should be conducted to identify any decking that needs replacement. Adequate Insulation: Proper insulation is crucial to prevent issues like ice dams in the North and excessive heat in the South. Ventilation: Proper ventilation is essential to prevent premature roof failure and maintain the integrity of the roofing system. Brand Certification: Choose a roofer certified with major brands for quality assurance. Clean-Up Plan: Ensure the roofing contractor has a good system for cleaning up debris after the project is completed. Financial Stability: Check the financial stability of the roofing company to avoid potential issues during the project.
Park Vehicles Away: Park vehicles away from your home before the roof replacement begins. Prepare Inside of Home: Get the inside of your home ready for the project to minimize disruptions.
Protect Landscaping and Yard: Take steps to protect your landscaping and yard during the roof replacement process. By following this checklist, you can ensure a smooth and successful roof replacement process while safeguarding your property and investment.
Essential Checklist Installation and Roofing Material
Choosing the right roofing materials is an important part of the preparation process. You’ll need to consider factors such as your budget, climate, and style preference before making your decision. Once you’ve selected the best material for your needs, it’s time to begin prepping your roof for installation.
If you’re installing a new roof on top of an existing one, you’ll need to start by removing any old shingles or other materials that may be on the surface. This can be done with special tools or by hiring a professional contractor. Once this has been completed, inspect the area for any signs of damage or wear and tear so that it can be repaired prior to installing the new roof.
Asphalt shingle roofs
Asphalt shingle roofs are the most common type of roofing system used on residential properties. They are made primarily of asphalt shingles, which come in three main types: 3-tab, dimensional, and luxury. 3-tab shingles have three tabs on each shingle strip, dimensional shingles provide a random pattern or simulate the look of wood shakes, and luxury shingles are larger and designed to resemble slate.
Asphalt shingle roofs also consist of other roofing materials and components, such as roof decking, roof flashing, underlayment, drip edge, ice and water shield, shingles, ridge capping, roof vents, pipe boots, and flashing. These components work together to ensure the roof remains leak-free and protects the home from the elements.
The lifespan of an asphalt shingle roof depends on the type of shingle used. 3-tab shingles typically last for 25 years, while dimensional and luxury shingles have a lifespan of 30 years. However, the actual lifespan of an asphalt shingle roof can be influenced by factors such as proper installation, attic ventilation, and regular maintenance.
New Roof
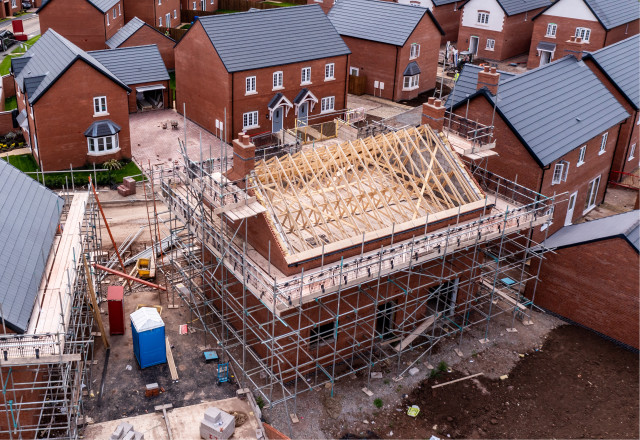
When installing a new roof, it is important to take the right steps to ensure a successful job. New roofs need to be designed with an appropriate pitch, decking, and underlayment that will meet the necessary building codes in your area. The pitch of a roof affects how much rainwater can flow off the roof surface and should typically be between 2/12 and 12/12. Most areas require a minimum of 2/12 slope for asphalt shingle roofs.
In addition, the roof deck should be made from strong materials such as plywood or OSB board that have been treated with water-resistant sealants to prevent moisture damage. Sandpaper can also be used to make sure that all surfaces are smooth before laying down any underlayment materials such as felt paper or ice and water shield.
Finally, flashing is an important part of any new roof installation. Flashing helps protect vulnerable areas of the roof from water damage by providing a barrier between different parts of the roof structure, such as the hips and valleys. Flashing materials should fit snugly over joints where two pieces meet and should be sealed properly with caulk or tar for added protection against leaks.
Old Roof
When installing a new roof, it is important to inspect the existing roof for any signs of damage or wear and tear. This can include cracked, curled, or missing shingles, as well as exposed nail heads and flashings. Additionally, look for any moss or algae growth that may indicate moisture buildup in the underlying roof deck. If you find any of these issues, it’s best to repair them before applying the new roofing materials.
In addition to inspecting your old roof for damage, you should also check its structural integrity by checking for signs of sagging or movement in the decking and rafters. If you find any weak spots, they should be reinforced prior to installing the new roof. Furthermore, inspect all existing flashing around skylights, chimneys, valleys, and other openings on the roof’s surface to ensure that it fits snugly and is properly sealed with caulk or tar.
Finally, make sure that all gutters are clean and free of debris; clogged gutters can cause water buildup on the rooftop which will increase the chances of leaks developing over time. A thorough pre-installation inspection of your existing roof will help ensure your new one is installed correctly and lasts for years to come.
Roofing Contractor
When installing a new roof, it is recommended that you hire a qualified and experienced roofing contractor. A professional contractor can help you determine the best type of roofing material to use for your home, as well as any additional precautions that may need to be taken during installation. They can also take care of the entire process from start to finish, including removing old shingles, laying down underlayment, securing flashing, and sealing seams with caulk or tar. Additionally, they will ensure that your new roof meets all local building codes and passes any necessary inspections.
A roofing contractor should also have access to quality materials that are designed specifically for your climate. For example, in colder climates where there is a greater risk of ice-dam formation, contractors may recommend using specialized materials such as self-adhering membranes or asphalt shingles with integrated ice-and-water shields. In warm climates, special reflective coatings can help keep your home cool by reflecting sunlight away from the surface.
Before selecting a contractor for your project, make sure to check their references and read reviews from other customers who have worked with them in the past. You should also request proof of insurance coverage to make sure that you are protected if anything goes wrong during installation. Finally, get several quotes from different contractors so you can compare prices and services offered before making your decision.
Install a new roof
To install a new roof follow these steps:
Obtain the proper permits.
Tear off the old roof.
Inspect the roof deck for water stains, cracks, or other damage.
Lay the underlayment, such as felt paper, nailed down every 12 inches.
Install the drip edge at an angle slightly below 45 degrees.
Install valley flashing if you have valleys on your roof.
Install starter shingles along the eaves and sides.
Lay shingles row by row, overlapping them and nailing them down.
Install step and dormer flashing where needed.
Add vents as necessary.
Install the ridge cap, shingles going the opposite way to create a tight seal.
Replace or clean gutters and install gutter guards if desired.
Conduct final checks and clean up the area.
Remember to hire a professional contractor for a safe and correct installation.