
Strip a roof
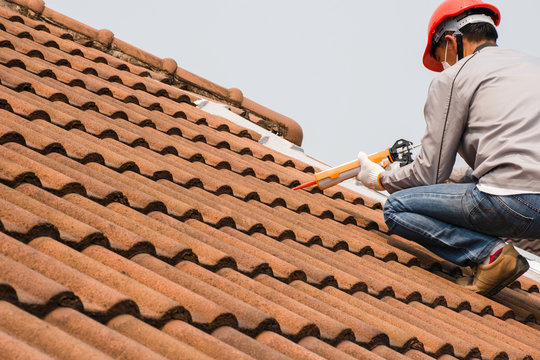
First, make sure to strip a roof. You have someone who is experienced to help on-site. You should also be fully aware of the safety measures before starting this kind of work. Here are some tips which may help you in stripping a roof.

- Wear protective clothing such as overalls or gloves and boots when handling any materials. Also, wear eye protection even if clearing away only small amounts of material is involved.
- Use ladders correctly whenever there are heights involved, and always let other people know where you are going. Ensure that all access routes including steps and ladders are kept clear at all times to avoid accidents from occurring; move equipment found on your way with care so as not to trip over it while working.
- If you have to move a ladder when working on a roof repair, ensure that it is moved with caution and slowly; if the ladder is in an unstable position or has been badly positioned it could become very dangerous, so be careful at all times.
- Never stand up straight on the ridge of the roof as this will put you off balance (unless absolutely necessary) and can lead to an accident if anything happens unexpectedly.
- Watch out for obstructions like chimneys, gutters, or pipes that might fall over during the process of stripping a roof repair as they may cause harm to you if they fall while you are around waiting for them to fall. You should also avoid touching leads which are charged sparks because they can be dangerous.
- If you are unsure about anything, ask someone with experience before starting the stripping process and double-check that they are aware of what you are planning to do.
- Ensure that any chemicals used for removing mastic or lead are lead-free and safe for use in humans; discard them safely after use – it is illegal to dispose of dangerous liquids or solvents this way.
- Never take chances as many roof repair materials can be very slippery so make sure you wear the right footwear on site if need be. In addition, some materials may contain substances that could cause harm if they get into your body so if you have any problems with reactions after contact with a material on a roof, seek immediate medical advice (if possible) as you may have been exposed to harmful substances.
- When using power tools, always be sure that the roof is stable enough to support your weight before stepping onto it, and do not climb up on a roof if it is slippery or not safe for use. If unsure about anything safety related, ask someone with experience first before attempting anything.
- If you are stripping an asbestos roof ensure that you follow all health and safety requirements laid out by the government; this includes working with asbestos sheets safely and disposing of them properly after use (make sure they go to a special landfill site). You should also inform your family members about any dangers involved in stripping an asbestos roof so that they know what precautions must be taken during work hours.
- If there are children or animals in your household, keep them away from the roof repair project while you are working on it to avoid any accidents. Even if no one is at home, securing the house before leaving for the day can help avoid anything untoward happening while you are away.
- If the roof is unstable, you should reconsider starting work and consider alternative ways to get the job done until it can be made safe for repairs. You should create a safe environment while working on a roof that might not be at its most stable (such as using boards or other supports to ensure safety).

All in all, stripping a roof is not a difficult task if done correctly; however, it requires experience and you must always keep yourself safe before, during, and after your project is complete.
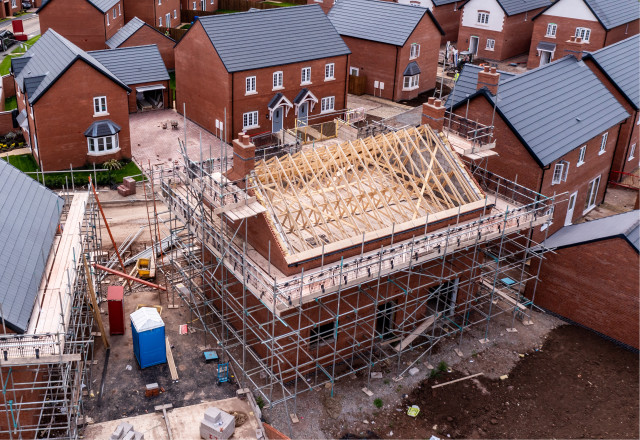
It is not always necessary to remove the old roof before installation of a new one. In fact, in many cases, it’s easier to just strip the old roof off for roof repair. The process typically involves other steps like tarping and building scaffolding. Even though it’s not required, removing the old roof will make it easier on your whole crew because you won’t have to worry about hidden nails or loose shingles.
Before you begin the process, make sure that all of your materials are on-site and ready to go. The list might include a hammer, pry bar, crowbar, work gloves, and safety glasses or goggles. It would also be a good idea to have someone walk around with a ladder in case they need to climb up and down it many times throughout the day.
Flip over the roof so that it’s flat on the ground. Roll out tarps or put up scaffolding near the edges first so that there is something for debris like shingles to fall onto while you work on other areas of the roof. Walk along one edge at a time and look for nails sticking through the top portion of each shingle. You need to pull each one out. If you’re not able to do this, then it could mean that the nails were driven too far down into the plywood underneath and will have to be removed with a crowbar or pry bar instead.
Once all of the nails are pulled out, grab your hammer and pry bar and start prying up shingles at various areas of the roof repair until you get to plywood underneath them. Continue making small holes in different areas so that you can remove a large section of shingles when it becomes time for that step.
When it comes time to actually remove several rows of old shingles from a strip on top of the roof, lay down your ladder and walk to the first shingle. Grab it with one hand and pry up with your other hand while pulling it toward yourself. You’ll also want to make a large hole just below that spot in the shingles so that you can remove as many rows of shingles as possible. Repeat this process all along the row until there are no longer any nails holding down the shingles on top.
Once those old, broken pieces have been removed, walk over to the tools area and grab your hammer, crowbar and pry bar again. Use these tools to remove each nail from the plywood underneath, then pick them up with your gloved hands and throw them into a trash bin or dumpster. If the plywood has been damaged, then it needs to be cut out as well.
Chimney Repairs
Chimney repairs on a property can be extremely costly and hazardous so it is important that those of you looking to strip a roof are aware of all possible risks before trying such a project, particularly if you have no previous roofing experience. Many people dread doing roof repairs because they are unsure of what is required. Roof repairs are much easier than you would likely imagine, especially if the work area can be accessed from the ground level.
See a professional before attempting to strip a roof repair on your own; however, it is easy once you know how. Make sure that your permit is in hand before starting any work and always keep yourself or other crew members safe at all times by using tools properly and donning safety gear (such as gloves, goggles and helmets).
To remove shingles without damaging the wood underneath them first use a pry bar or crowbar to lift one just enough so that you can grab it with both hands. The best way to do this is to begin in one corner of the roof repair and work your way around it. There is no hurry so take your time and make sure that nails are removed from each shingle before moving on to the next step, which involves removing them completely.
If you have any second thoughts about doing repairs a roof or are unsure of how they can be done well, please use a professional who has experience in such matters rather than attempting to do this type of work yourself. Some projects may sound simple to do by yourself but end up costing more due to improper handling. Here are some other reasons not to try stripping a roof on your own.
Shingle Roof Repairer Tips:
– sealing granules that are used to protect roof repairs may be harmful if swallowed or inhaled by workers. Avoid handling them without proper safety equipment and protective clothing such as gloves, goggles, dust masks, ear plugs, and full coverage clothing. If possible wear a breathing mask with an integrated cartridge that protects the nose and mouth from dermatological irritants. A particulate filter should also be used in situations where air is considered to contain significant amounts of pollution (like we see on construction sites).
– wear protective gear, particularly for the hands and feet. The use of gloves is important in order to prevent cuts that may lead to infection after exposure to bacteria on the roof. If you need to work on a roof that has been covered by ice or snow, make sure that you have ice grippers so as not to slip. Shoes with a rubber bottom are recommended since they will protect your feet from the sharp edges of nails and other objects stuck into the wood. You should also consider wearing steel toes for extra protection against falling objects but those must be worn with safety boots instead of regular shoes.
– avoid cutting corners when it comes time to strip shingles off roofs. It’s advisable that you get rid of the entire layer of shingles, including granules. Doing so will allow you to properly inspect the roof for defects and seal small holes found underneath so that water leakage is prevented during rain storms or winter months.
– get rid of nails only after removing shingles completely. This step should be done whenever possible as it enables easier installation of new materials onto an existing roof. Cut out any old shingles that have been damaged by the removal process before bagging them up for disposal into a dumpster or trash can. Don’t simply throw away nails though, instead place them in your tool kit so they can be reused later on when repairing other areas with similar problems (garage door jambs, loose deck boards).
How To Fix Roof Leaks Without Stripping The Whole Thing?
Leaks are one of the most common repairs to a roofing system and they can be quite expensive to fix. When it comes time to replace materials like shingles, tar paper or roof felt, this repair gets even more costly. A leak may not seem like such a big deal and theoretically, it might not be; however, you want to make sure that you take care of this problem before it becomes worse.
When leaks or other issues need to be dealt with on a roof, you will need access to the full roofing system which means you have two options. You can strip off all the shingles and then re-roof the entire area or you can work from ground level.
Stripping or removal should only be considered if it is the best option. This may not always be the case so make sure to seek out professional advice before going ahead with this type of work. In fact, some roofs are built in such a way that striping them down is almost impossible. If your roof has several layers and levels of protection, then stripping can be very risky so you will need special equipment for this task.
When it comes time to repair leaks on a roof without stripping off all material, you will have to come up with a plan first because many times general access is restricted and the area where the leak or damage occurred cannot be accessed from ground level because there may be no one spot to stand on or an accessible ladder might not be available.
One of the easiest ways to repair roof leaks is using a patch inside the attic or from the roof’s edge. This method allows you to work without stripping off all layers and it can be done one shingle at a time which saves you a lot of time. It is also less risky when compared with stripping an entire roof because this procedure does not need special equipment or any advanced skill level.
This article will show readers how easy it can be to repair small roof leaks themselves and the cost to repair them even if they have never tried anything like this before and do not have many tools on hand. The first thing that needs to be done is to find the source of the leak.
There are a few ways that you can do this. You can go up on your roof, or if it is not safe for you to be there, you may have to wait until it rains and see where the water flows under your roofing system. To find out for sure, use a flashlight when it’s dark outside or shine a laser into the suspected area. Once you have found where it is leaking from, take note of how large the area appears to be because this will help determine what materials and tools that you need for sealing it off. Draw out a diagram showing where the problem has occurred so that in case things change later on due to weather conditions or other factors, then you will know where to look for leaks.
Now that you have an idea of what you are up against, it is time to find the right tool or materials to fix your roof leak. When choosing a repair method, do not forget about safety because if this is your first time working on one of these things, you certainly want to make sure that nothing bad happens in the process. That being said, there is no reason why you cannot choose something simple and easy like a rubber sealant product which can be purchased at any hardware store. These products come with instructions and will not take long to apply so they may be a nice option to start with when working on a new roofing project.