
Installing a new roof is one of the most important investments you can make in The 5 Definitive of Preparing Roof. It’s essential to ensure that it is done correctly and safely, as any mistakes could lead to costly repairs down the road. Preparing your roof for installation is an integral part of this process, and following these steps will help ensure that your new roof lasts for years to come! In this blog post, we’ll provide you with a definitive guide on how to properly prepare your roof for installation.
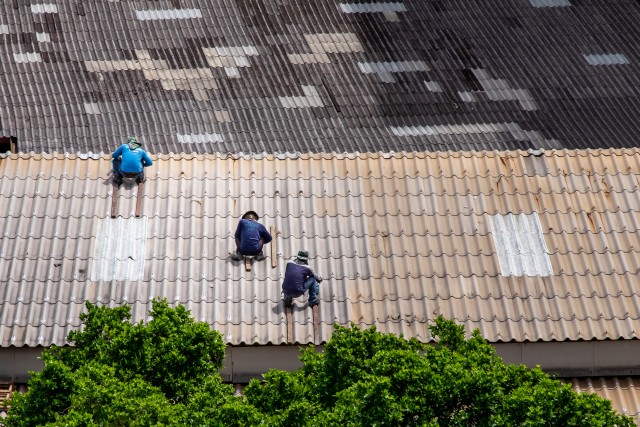
The first step is to inspect your existing roof. You’ll want to make sure that there are no signs of damage or wear and tear, as they can affect the installation process. Additionally, check for any loose or missing shingles, flashing, nails, and other debris. If anything needs to be replaced or repaired before the new roof is installed, it must be done prior to the installation process.
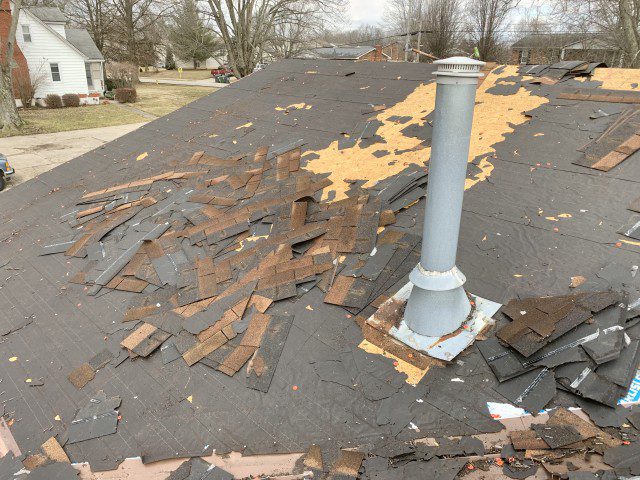
The next step is to remove any existing materials from the roof that will not be reused during installation. This could include old shingles, tar paper, insulation, and any other material present on the roof deck. Make sure that all these materials are disposed of properly so that they do not pose a hazard to those working on the roof.
Clean the roof deck
The third step is to clean the roof deck. Make sure that all debris and dirt are removed from the area, as this may cause issues with the installation process. Use a broom or air blower to get rid of any extra material that could be present. Additionally, inspect for any standing water or potential drainage issues that may have developed over time; taking care of these ahead of time can help prevent future leaks.
Finally, make sure that your roof deck is in good shape before installing your new shingles. Inspect it for cracks or damage and repair it where necessary; if you are unsure about anything, contact a professional inspector to assess the condition of your roof deck prior to proceeding with the installation.
By following these steps, you can ensure that your roof is properly prepared for installation and will last for years to come. Remember to use caution when working on the roof and consider enlisting professional help if necessary. Following this definitive guide to preparing your roof for installation will help protect your home and provide peace of mind!
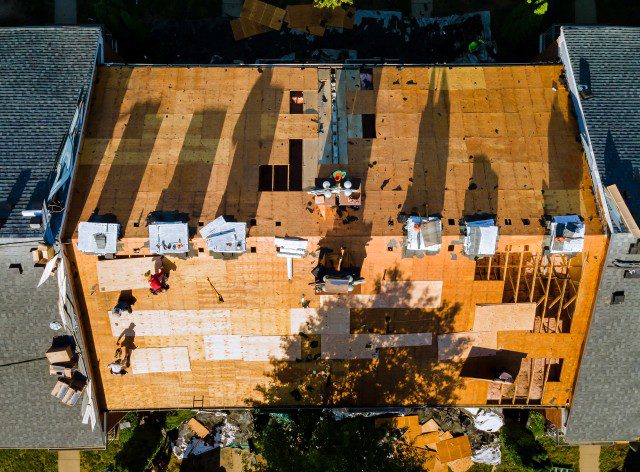
Once the roof deck is prepped, it’s time to begin installing the new materials. Make sure that all the materials used are in good condition and appropriate for the area you’re installing them in; different climate zones may require specific shingles or tar paper types, for example. Additionally, inspect each material prior to laying it down to make sure there are no signs of damage or wear and tear.
Finally, it’s important to follow the manufacturer’s instructions for the installation process. This will help ensure that your new roof is installed correctly and safely. Additionally, these instructions may recommend a specific type of ventilation system or other measures; following these recommendations can prolong the life of your roof and protect against common issues such as water damage or mold growth.
The 5 Definitive of Preparing Roof Installation
Roof installation is a complex process that requires careful preparation and attention to detail in order to ensure that it’s done correctly. Before beginning the installation process, make sure that you have all the necessary materials and tools available. This could include tar paper, roofing nails, shingles, felt paper, flashings, ridge vents, and other accessories. It’s also important to use a ladder and safety equipment such as harnesses when working on the roof to prevent accidents.
The first step of the installation is attaching the underlayment. The underlayment provides protection against moisture and should be attached securely to the roof deck using either staples or adhesive products specifically designed for this purpose. Once it’s in place, begin installing the starter strip along the eaves of the roof; this will help ensure that your shingles are installed in a straight line without any gaps between them.
Next comes the step of laying out your shingles one by one along each row from bottom to top. Remember that you must overlap each shingle with its neighbor in order to create a stronger bond and ensure proper water drainage; typical overlap is typically two inches or more. Additionally, check for any signs of damage or unevenness as you lay down each row before moving on to the next.
Once all your shingles are laid out properly, it’s time to secure them with roofing nails. Make sure you drive nails through both sides of each shingle into the underlying sheathing boards; however, make sure not to over-drive them as this can cause excessive damage to your roof deck or shingles themselves! Afterward, seal any nails you drove into flashing pieces with an appropriate sealant before moving onto ridge ventilation systems if required.
New roof installation
Writing about new roof installation can be a complicated process for the do-it-yourselfer. Installing a new roof is more than just laying down shingles; it requires an understanding of different materials and techniques to ensure a sound, lasting roof that will protect your home from the elements.
Before you begin, make sure you have all the necessary materials on hand, such as tar paper, flashing, ridge vents, and shingles. Additionally, you should have safety equipment such as ladders and harnesses, as well as eye protection in case of flying debris. Once all the materials are gathered together, inspect them for any signs of wear or damage that may affect their installation or longevity.
The first step in installing a new roof is to attach the underlayment. This material helps protect against water damage and should be securely attached using either staples or adhesive products specifically designed for this purpose. Afterward, start installing the starter strip along the eaves of your roof to ensure that shingles will lay flat without gaps between them.
Next comes laying out your shingles one by one from bottom to top along each row. It’s important to overlap each shingle with its neighbor in order to create a stronger bond and ensure proper water drainage; typical overlap is typically two inches or more. Additionally, take time to check each row for any signs of damage or unevenness before moving on to the next row.
Roof replacement

Replacing a roof is a complex process that requires careful preparation and attention to detail in order to ensure that it’s done correctly. Before getting started, make sure you have all the necessary materials and tools on hand, such as tar paper, roofing nails, shingles, felt paper, flashings, ridge vents, and other accessories. Additionally, it’s important to use a ladder and safety equipment such as harnesses when working on the roof to prevent accidents.
The first step of the replacement process is removing the existing material from your roof. This could include nails, adhesive products, or even old shingles themselves; if unsure of how to proceed with this step in particular, consider hiring a professional for assistance. Afterward, inspect the underlying structure of your roof deck for any signs of cracks or damage; if detected, repair these issues before continuing with the installation process.
Once your roof deck is properly primed and inspected for any damages or potential drainage problems that may present themselves over time (such as standing water), begin installing the new materials. Make sure that all materials used are in good condition and appropriate for the area you’re installing them in; different climate zones may require specific shingles or tar paper types, for example. Additionally, inspect each material prior to laying it down to make sure there are no signs of damage or wear and tear.
After all new materials are laid out properly across your roof deck according to their manufacturer’s instructions (which typically recommend certain ventilation systems for optimal performance) it’s time to secure them with roofing nails. Make sure you drive nails through both sides of each shingle into the underlying sheathing boards; however, make sure not to over-drive them as this can cause excessive damage to your roof deck or shingles themselves! Afterward, seal any nails you drove into flashing pieces with an appropriate sealant before moving onto ridge ventilation systems if required Finally remember that following manufacturers’ instructions will help ensure that your new roof is installed correctly and safely so always take care when replacing a rooftop!
Potential drainage problems
Drainage problems in a property can lead to various issues like water accumulation, erosion, and structural damage. Here are some common drainage problems and solutions:
Improperly Installed Downspouts and Gutters: Ensure downspouts are pointed away from the home and lead far enough away. Clean gutters regularly to prevent overflow1.
Improper Grading: Properly grade your yard so water moves away from the house. Consider using a swale or filling in low spots1.
Runoff From Neighbors: Address runoff from neighboring properties by creating diversions to redirect water flow.
Surface Depressions: Fill in depressions or use a swale to help water drain away from flat areas.
Soil Issues: Test your soil’s drainage by digging a hole and observing how quickly it drains. Improve soil with sand, pea gravel, or organic matter as needed.
If you’re experiencing drainage issues, it’s advisable to consult with experienced landscape contractors or excavators who can assess the situation and provide appropriate solutions3. Additionally, a qualified landscape contractor can help address drainage problems effectively while considering factors like hydrology, soil properties, grading, and vegetation in the landscape.